
Making kids friendship bracelets the easy way
N is always debating ways to make money, even though he never follows through with them. Well, he chose toys to sell, but we’ve not been very successful so far. He also requested pocket money and we arranged a contract for it based on simple day to day tasks he should be doing, but not much has happened for him to actually get any money yet! But it made me think back to my childhood and what we used to do to try and make a bit of money.
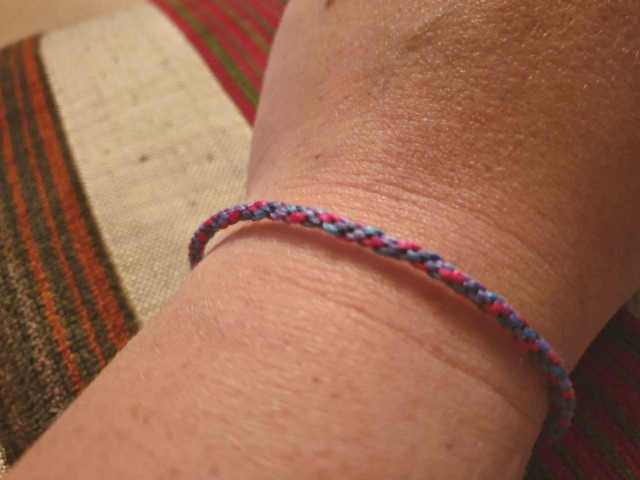
Our favourite, and probably most successful (ok, only successful attempt) was making friendship bracelets. Even to this day, you quite often see people with simple yarn bracelets, so I suggested N try making some. He wasn’t keen at first, but I’d seen some easy versions online a while back. And then speaking to another mum at swimming, saw her daughter making one before the lesson.
They’d even made up some kids friendship bracelet kits to sell at their local fete. A great idea, and a good way of helping children do something more interesting on a rainy day. They also don’t need lots of room or supplies to make them, so they’re easy to take on journeys or when going on holiday.
I have what feels like a never-ending Hobbycraft gift card, so we headed to get some embroidery threads to make the bracelets. You can of course use any yarn you want – could be good to start young children off with thicker yarn to get them used to making them. But use something smooth rather than fluffy like wool which could get caught a lot in the template. Several pounds later we had a stash of about 10 or 11 different yarn colours to play with.
I thought starting N off with knotting might be a bit hard, so decided to opt for the easy version using cardboard circles. This is more like using a knitting doll, just moving the strands over to another hole, rather than knotting in order, so much easier for children to remember where they are.
How to make easy kids friendship bracelets
To make easy friendship bracelets you need:
- Embroidery thread – 7 lengths, about 50 cm long each. You want at least 2 colours, but 3+ will look more colourful.
- Decent thickness of cardboard – I used a cereal box, but it could do with being a little thicker so it’s more rigid.
- Scissors
Instructions to make friendship bracelets:
1, Find something round to draw round to make a circle on the cardboard. A mug size is probably good for little hands. Make several while you’re there because batch tasks are more productive, and you’ll probably want to do it alongside your child. Cut out the circle.
2, Find the middle and make a hole in it. It needs to be big enough for a narrow circular cord to fit through but not so big that the bracelet comes loose and falls through. A pencil size is plenty big enough.
3, You want 8 cuts equally round the edge of the circle. Just small 1cm cuts will do.
4, Pop the ends of your 7 strands together through the hole in the centre of the card circle, and tie the short end together. I tend to leave a bit longer free at the end of the knot so I can plait the ends and tie the 2 ends of my bracelet together taking it on and off. But if you’re just going to tie it permanently you don’t need a long bit at the end free. To start with you’ll need to hold the knot in place to stop it pulling back through as you work, but this need will reduce the more you make.

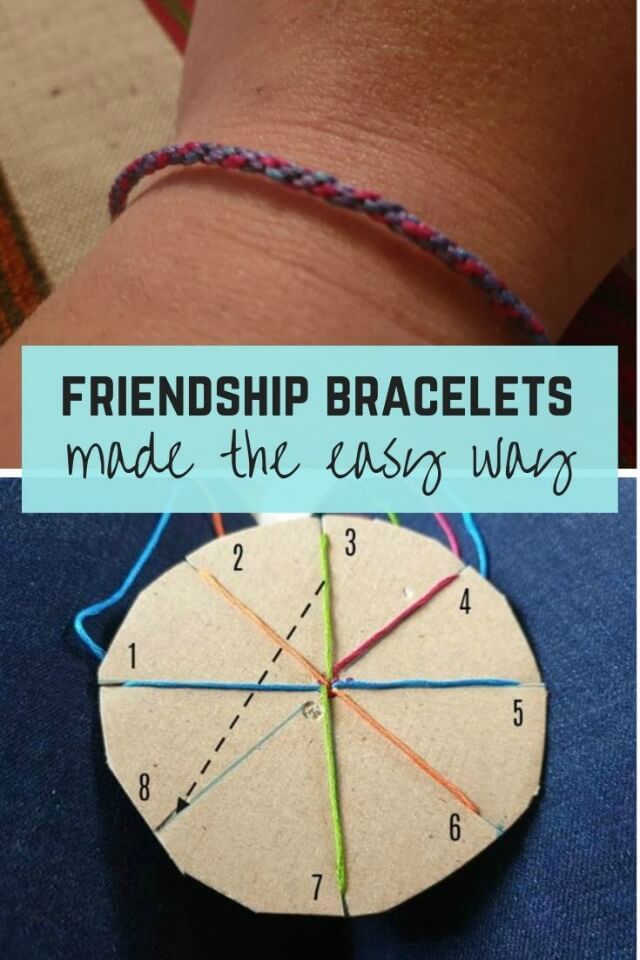
5, With the knot side on the bottom and the long strands above, open up the strand lengths and put one in each 7 of the cut notches of the circle. The knot should be tight against the hole. You’ll end up with one spare notch. (number 8 on the diagram)
6, Decide if you’re going clockwise or anticlockwise and keep to that direction. I find it easiest to keep the spare notch nearest me.


7, Count the 3rd strand clockwise from the spare notch (no. 3 in the diagram), and move it down into the notch. Rotate the card so the new spare notch is nearest you, count the 3rd strand away and moving it down into the notch. Rotate, and move the 3rd strand.

8, As you go, the bracelet length should start to build up and the knot will move downwards. You might need to give it a little tug to make sure the bracelet is forming straight down through the hole. It’ll take a while to get going but is quite quick to progress.

9, Once you get the length of bracelet you want, remove from the card circle and knot the end near the bracelet. Then either tie directly around your wrist and cut off the ends. Or plait the remaining threads at each end of the bracelet so you have 2 ends to tie in a bow meaning you can remove and retie your bracelet. You can just use basic knots to tie them.

Tips for making kids friendship bracelets
If you want a thicker friendship bracelet you could use thicker thread or double up. Or cut more slits in the card – adding 2 more (10 slots), but move every 4th thread, rather than every 3rd. All of these will make a lovely chevrons braid.
Plain card is easier for children to use and focus with. Number the notches if that helps.
Gifting and friendship bracelet kits
Make a friendship bracelet kit and they’re great to give for presents, or to sell at fundraising events.
To put together a bracelet kit, you just need some embroidery skeins – 3-4 colours, a prepared card circle, and instructions. Pop it in a little drawstring bag or gift bag.
Making easy friendship bracelet patterns is a brilliant way to keep children entertained on playdates, sleepovers or crafting parties. We’ve even taken them on trains and camping. Just pop threads, scissors and card circles in a bag or tin.
You can buy friendship bracelet supplies from local haberdashery stores, Hobbycraft or Amazon – check out the affiliate links below.
I’ll share my old school method using knotting at a later date. Do let me know how you get on making these kids friendship bracelets in the comments, or share your pictures on social media and tag me.
Alternatively, use thin cords and beads to make even simpler friendship bracelets. You can make these on elastic and just knot tightly. But cord makes them more like traditional friendship bracelets. Children can add phrases or their name in letter beads. Just knot outside of the word to keep the beads all secure in one place, then do slide knots to make the friendship bracelets larger and smaller to get on and off. Or just securely knot if they’re able to keep them on permanently.

Kids easy friendship bracelets
Make easy friendship bracelets with just card and thread. No knotting involved.
Ingredients
- Skeins of embroidery thread You need 7 lengths, of 2-4 colours
- Cardboard Cereal box minimum thickness
Instructions
Find something round to draw round to make a circle on the cardboard. A mug size is probably good for little hands. Make several while you’re there because batch tasks are more productive, and you’ll probably want to do it alongside your child. Cut out the circle.
Find the middle and make a hole in it. It needs to be big enough for a narrow circular cord to fit through but not so big that the bracelet comes loose and falls through. A pencil size is plenty big enough.
Using a ruler measure out 8 lines across the diameter of the circle like 'spokes', evenly spaced
Cut short cut at the edge of each of the lines
Pop the ends of your 7 strands together through the hole in the centre of the card circle, and tie the short end together. I tend to leave a bit longer free at the end of the knot so I can plait the ends and tie the 2 ends of my bracelet together taking it on and off. But if you’re just going to tie it permanently you don’t need a long bit at the end free. To start with you’ll need to hold the knot in place to stop it pulling back through as you work, but this need will reduce the more you make
With the knot side on the bottom and the long strands above, open up the strand lengths and put one in each 7 of the cut notches of the circle. The knot should be tight against the hole. You’ll end up with one spare notch. (number 8 on the diagram)
Decide if you’re going clockwise or anticlockwise and keep to that direction. I find it easiest to keep the spare notch nearest me
Count the 3rd strand clockwise from the spare notch (no. 3 in the diagram), and move it down into the notch. Rotate the card so the new spare notch is nearest you, count the 3rd strand away and moving it down into the notch. Rotate, and move the 3rd strand.
As you go, the bracelet length should start to build up and the knot will move downwards. You might need to give it a little tug to make sure the bracelet is forming straight down through the hole. It’ll take a while to get going but is quite quick to progress.
Once you get the length of bracelet you want, remove from the card circle and knot the end near the bracelet. Then either tie directly around your wrist and cut off the ends. Or plait the remaining threads at each end of the bracelet so you have 2 ends to tie in a bow meaning you can remove and retie your bracelet.
How to do slide knots
Try one of these related posts


